WARNING! Possible graphic content!

Screenshot of the Cordyceps freely spreading in the cellar of Boulder University. (Entering only with functioning breathing protection!)
I took several of such screenshots myself for my research as there are hardly any of the in-game fungi online. All you can find is the infection and this already deceased host:


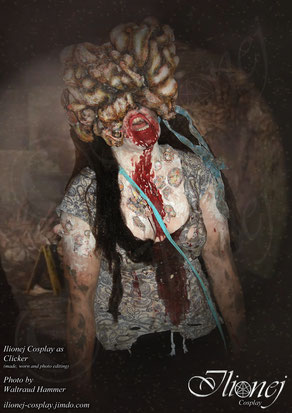
Clicker
As mentioned on the top page to the game, there are several stages of Cordyceps infection. In stage 4, the infected are called "Clickers" due to the sounds they make to orientate and track bait, much like bats would do. This is due to the hardened fungus having split their skull and finally having blinded them.
It is therefore safe to say you may use your torch right in front of any Clicker's overgrown nose. But if you make a noise, it might just as well have been your last. How wonderful life is with all those ruined buildings, that they also provide a lot of trash you can throw around to distract these bastards.
Here is a video(including concept art and screenshots) of the the ominous sounds Clickers make. They sure are some force out of nightmares..
Costume Info
One would think, given the hair and eye colour, the one being from the game I would cosplay would be Ellie? As and adult? Yes? Well.. If it hadn't been for that invitation to the 2015 Hallowe'en Ball in Graz..
So, of course, someone like me does not simply go to such a ball as any regular undead. I may have been in company of the most charming Vampire, but this does not mean I was not in for obstacles.
I somehow even felt like a real Clicker, seeing only through 4 small holes. But more on that, of course, further below. :)
How "She" became a Clicker - the fastest infection progress ever
It all started on a mild autumn evening. She received an invitation to a ball. Flattered, of course she accepted. And with all the tragic news of people mysteriously getting sick, she needed the distraction more than ever. But unfortunately she barely still fitted into her favourite ball gown. Therefore, the ball being a few weeks ahead, she decided to go jogging again. Here is the selfie she took minutes before she left the house:

Never had she thought that it would happen to her. Not now. She wanted to go to that ball so badly. But minutes - minutes - had she not stretched outside. What if she had stretched inside. Right before the door this beast had sprung around the corner. She hadn't even heard the Runner. Luckily there had been a stone she had managed to get hold of. Sure this thing was dead. She had escaped with her life..but for how long..
It had felt like an aching muscle, in that moment. Everything had happened too fast. She had been on the ground before knowing what was going on. But what was going on now, was not nearly an aching muscle..

Panting heavily, losing focus, she stood before the mirror. The rattling sound of the Runner's breath still in her ear. Or was it her own? Her head felt like it was about to explode. When she had taken the photo of the scar, she couldn't remember. Somewhen she had grabbed her bag. Was it yesterday? Or ten years ago?
Had she been outside ever since? Or had that been a halucination caused by the infection?
The light was still on, that much she knew. So not everything was forsaken. The light was still on. She was still alive. Alive enough. The phone still in her hand. Nearly lost routine turned it on, a trembling finger and unfocused eye through a gap searching for the camera. It must be that...that evening. The..evening of..the..ball. She..had managed.. She was still. Alive..
Still..alive. Al...ive....ali..ve... en...ough....for...one...la..st.....selfie....

Costume Status
~ FINISHED ~
Time exposure:
-
Mask: 26h15
- Body fungi: 1h50
- Leggings: 3h10
- Sash: 41h35
- T-Shirt: 3h10
- Pouch: 1h35
-
Shoes: 0h40
- Socks: 0h05
Total: 38h45
Costs:
- PU-foam: 8.00€
- Cardboard, buckles, other material estimate: 6.00€
- Wig (from Esmeralda): 21.90€
Total: 35.90€
Hallowe'en Ball 2015, October 31st, Congress, Graz(Austria)
Photogallery: Clicker - Progress
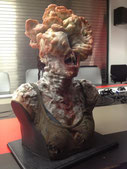
Mask

Funny when you notice your mistake when you're done. I swear, I didn't see that the eyes weren't aligned. XD
Now. For the templates I used the common technique of kitchen foil+painter's tape. The base for this was a plaster bust of myself. I marked the parts that felt right, cut everything up and also cut where the tape bulged. Since it didn't need to have a beautiful exact shape, I traced the parts directly onto fine cardboard. Those pieces I hot glued together with curtain tape. Believe me, that :| face was not intended. It was just the mark for where I would insert the clasp later.
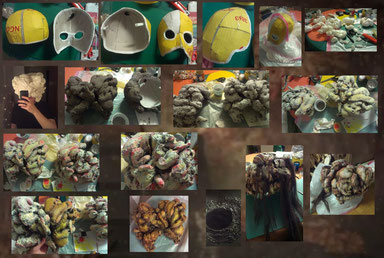
I repeated the process with regular cardboard, which I had to bend. This was hot glued onto the base mask. The seams are curtain tape again and all gaps are sealed with hot glue too. At this point I also added the rubber bands and clasp on top as well as those on the sides with a push button each to keep the two halves together. The push buttons aren't necessary for putting on the mask(or rather helmet); which I simply slip on; but for taking it off.
Then I went back to the bust. Make sure to cover not only the bust, but also a wide area of your working surface when working with PU-foam. WEAR RUBBER GLOVES! PU-FOAM CAN IRRITATE THE SKIN! Breathing protection is not necessary if you leave a window open, but desired! Think of your lungs! You only have that one pair!
For covering I use garbage bags. This brand of cheap clear ones even resists epoxy resin hardener. ;) And when done, I can simply flip them over with all the waste already being on the inside and ready to be deposited.
Hopefully you can understand that it was impossible for me to take photos while working with the slippery foam. It does dry quite quick, but before that you have to push it back into position several times. Gravity is the enemy. I also sprayed a few bigger and smaller pieces as I didn't know how it would expand in the end. This was my first time working with this brand. I needed them for the body pieces anyway.
Then I cut off the necessary pieces, as well as glued stuff on. You can easily use a carpet knife and hot glue. Other glues might react with the foam and just make an even bigger mess than the wet foam did. I also glued black tulle onto the eye holes to make my own eyes less visible on photos.
Using spray paint is also not wise, so I used acrylics. The base was a muddy greyish brown. Then I put on my beloved mix of phosphorescent white(not only because I love it and have devoted myself to it, but because somehow these fungi have a kind of glow in the game's darkness). The next layers were a little light yellow and dark salmon red, as well as black for the deeper parts. This was a rough and messy but fun work with some brushes and a sponge.
Next I put on rubber gloves again because acrylic ink is a devil(and doesn't stick to PU-foam either ;) ). I coated everything with it to make it look more fungus-like. For this I used a brush as well as soft paper towels to remove the excess. Then went over it again, with the white, yellow and red.
I did the same with the body fungi, which I only dipped in acrylic-dyed liquid latex to be able to attach them with spirit gum.
Before painting the inside black, I glued in a stripe of velcro tape to where the mask would sit on my nose. Its opposite I sewed onto the folded half of an old cotton sock. A wonderful removable nose protection. Believe me, I was so grateful I did that.
Last I sealed everything with acrylic varnish and hot glued loose strands; which I had luckily kept when I had styled the wig; into some of the holes.
Clothes

You won't believe how much fun I had messing up these clothes!
Making the crappy pouch from old pyjama pants wasn't THAT much fun, but making a mess definitely was! :D
My biggest friends were the "Dirt Mix" - the acrylics I used for priming the mask - and brown/red acrylic ink.
The ribbon is some butterfly thing from the deco department. Burnt holes in and treated it with the Dirt Mix.
I let the t-shirt soak in acrylic ink for two days while I made the mask, rinsed it out and let it hang dry. Then I roughly cut holes into it and the old leggings with a carpet knife. Nearly had an accident there, so don't YOU go too wild if you'd do that. ;) The probably funiest part was to scrub two pieces: up on the flat roof's concrete tiles with our old, well, scrub. X'D I'm so glad nobody caught me. The explanations might not have been convincing.
To roughen up the surface a little more, I used the scotch brite side of a cleaning sponge; then the other side to really go wild with the Dirt Mix. It went onto all pieces. Even the socks, the old "granny" cotton bra from the early nineties and the already very used old trainers that I'd kept for cases of need(aka "garden" work). There you go, their final need was for Cosplay. :D
My mum nearly killed me when I told her she'd better shower quickly because I'd need the bathroom for a LONG time..
I had to cover everything with my notorious garbage bags because it was time to apply the acrylic ink onto the t-shirt and trainers. Since the tee was really soaked with brown and red, it had to dry for several hours.
Final touch

The night of the ball. :D
I may have done what shouldn't be done. Here you can see close-ups on the body fungi, shoes and lower pants, my wonderful behind and the "makeup". I did use makeup for the area around nose and eyes, red lipstick, as well as a theatrical makeup for the white base, but the main white is the acrylics mentioned above. Even here I used the Dirt Mix. And because fake blood might be healthier but is expensive and I've never tried it, I went with the red acrylic ink. >_< Yes, it spared me the trouble of treating the bra as everything trickled down onto it, but I will NOT recommend this if you have to keep this stuff on for a whole day, let alone several days in a row. It was only a few hours; not more than a photoshoot would take.
Acrylics aren't that bad. When painting excessively, they also dry on your skin and you can wash them off. Which, as well in this case, was no problem. Even the ink came off well. But as said, if you care for your skin, DON'T.
Acrylics do stay better however than even theatrical makeup and they are great in a cold night as they don't make a mess on the inside of your coat. And due to the lack of good sight - that made me crash into a toilet cabin door twice lol - I couldn't really dance anyway, which means the sweat was kept to a minimum. STILL!!! ESPECIALLY FOR THE FACE OR FULL BODY PAINT!! KEEP AWAY FROM IT!(I just don't want to be responsible for your Ouch. Thank you.)
P.S.: I even got recognised as a Clicker, at least twice(because I've been spoken to)! :D
~~~~~~~~~~~~~~~~~o~0~O~0~o~~~~~~~~~~~~~~~~~
Write a comment