Zelda
Skyward Sword
...and though there is a lot known about her already, I won't lift these secrets until I reached the end credits of Skyward Sword...
...or probably never...
Costume Info
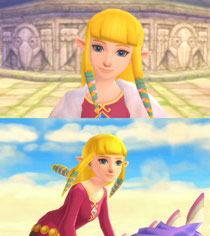
It all began in the year 2011. The year, in which the game was released. Fullest enthusiasm overwhelmed me. Me, in the middle of my cosplay-beginner-madness, couldn't do any different. This Zelda appeared to be easier in execution, to me. That, she was, in addition, no little princess that had to be rescued, but a youngster who, although having been kidnapped, made the best out of her situation and followed her fate with fullest dedication - was even more a reason for me.
The choice was set, the execution - in the end of course again not fully what I had intended. Back then I was driven by the idea to "make everything out of metal that was supposed to be metal, except full armour". In this case it would include the belt, brooch, the silver Buckle and maybe even the bracelets(which I wanted to make from enamelled copper). In the end it only became the golden belt. But more on that further below.

Costume Status
~ FINISHED ~
Time exposure:
-
Wig: 12h30
- Dress: 22h
- Brooch: 4h10
- Golden belt: 12h
- Sash and velvet belt: 9h10
-
Buckle: 9h25
- Bracelets: 2h45
- Sailcoloth: 6h15
- Harp: 31h05
- Ears: 4h25
Total: 113h45
Costs:
- Fabrics, ribbons(for wig as well) and other: 79.50€
- Wigs(sewn together): 48.98€
- Bracelets: 1.98€
- Tuning pegs: 8€
- Wooden bridge: 0.30€ (bar cost more, but there's much left)
- Paint, varnish, carboard, glue(projection): 15€
- Metal for belt: - (back then for free. See explanation belt, - value of the metal at ~80€)
- Contact lenses: 15€
excess material: €3.78(due to plan changes)
Total: 168.76€ (expandable to 252.54 ;) )
Nippon Nation 2017, July 8th, MQ, Vienna (Austria)
AkiCon 2017, October 22nd, Seifenfabrik, Graz (Austria)
ViennaComicCon 2017, November 18th, Messe, Vienna (Austria)
HanamiCon 2018, March 24th, Seifenfabrik, Graz (Austria)
1st place Cosplay Contest (category needle work), HanamiCon 2018
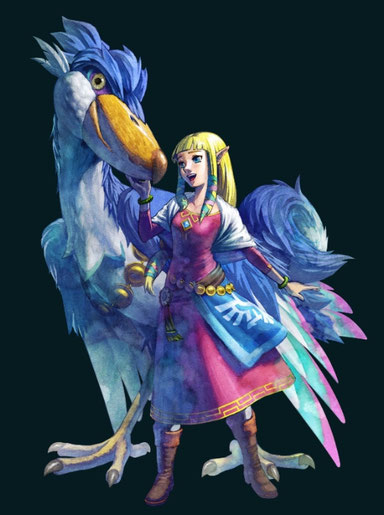
Photogallery: Zelda(SkwS) - Progress
Belt

Make it your project..or what ever that ad slogan is called. My first mass production, of sorts. To save money, I cunningly disguised everything as a school project: to the topic "Serial Jewellery". A serial jewellery is defined as one or more pieces of jewellery that can be produced in a duplicating process. That could concern the whole object or parts of it. The duplication can be executed by casting it, or by simply having the object being made of repeating segments.
In this case I added another meaning to "serial jewellery", namely, the video game series said object is from. (And since the newest part launched at about the time the topic was announced, it was simply obvious what I would do.) So I abused the excuse for my personal means und could still score, although the thing wasn't actually designed by me in first place.
The duplication laid in the similarity of the belt's segments: 16 brass plates which I drew out with dividers and roughly cut with mechanical metal cutters, for then grinding them in few minutes with a belt sander. The same happened to the hemispheres, which I systematically(each to one stage, then the next) embossed.
Last, a hole in each plate, not only to save weight, but so the air could evaporate while soldering on the hemispheres. (Air expands when being heated and would, especially at that size, blast the soldering joint before it would actually be cohesive.)

Here you can perfectly see - uh - the borings, aso. Also the semi-fused zinc solder. Compared to most silver solder it is light-body and slightly yellowish, which reduces the colour difference to the brass.
As well, because it's so nice, all the ufos next to each other and on top of each other. (Goodness, am I childish)
The green bath(actually turquoise by the dissolved copper oxide due to the frequent use) is the 3:1 diluted sulfuric acid that is used to remove the oxidations occurring while soldering. What you can't see here is that you will have to clean everything with a brass wire brush afterwards. Since it is serial jewellery, of course not with a hand brush, but at the gear motor. :P

Once again, all pieces, after having been treated with a rubber grinding wheel to remove the remaining copper oxide. Then the parts tot polished. Two holes were drilled into piece, which are connected with self-made oval rings. Rings or lugs are produced serially. You wind a(slightly annealed to reduce the tension) wire around a core of steel or wood, pull off the spring and cut off single rings with a saw(or a metal cutter, which won't create an as flawless joint). These rings are oval to grant better wearing comfort as well as smooth position of the belt, which means I had to shape them that way. Oval sticks or staffs in the right size are a comparatively rare find. Therefore I squeezed the spiral with a jaw vice(between aluminium plates or leather to prevent marks from the vice. A hook disguised by its oval shape allows putting the belt on and off.
Of course I could have spot soldered the rings, but I spared myself the work with an excuse: serially produce chains don't have soldered rings either. Also I would have needed to uses a very precise soldering device to reduce oxidation so I wouldn't need to clean and polish the whole thing once more.
Again, as a reminder, the belt has been made by me by hand in only 12 working hours. Only machines used: drill, sander/grinder, polishing wheel.
If anyone should be interested, I offer to discuss cheaper and easier methods in a personal(or via e-mail) conversation. After all I don't expect anyone to work with metal for a sole cosplay.

Length: 120cm (each element is 6cm in diameter)
Wig


And finally I got the time to sew the two identical wigs together for giving it all more volume. I still need to do the bangs, but all in all I'm absolutely satisfied with the result.

Sailcloth

Not much to say other than that I used a relatively free and rough shape. I traced the Loftwing off the original cloth, cleaned the lines and transferred everything onto the fabric with acrylics, rather than fabric paint(originally intended). With a gel pen I transferred the outlines and then simply and carefully painted the pattern(of course with a pad beneath). Since it is me, the paint glows in the dark. Unfortunately you can't see the slight blue hue here. It is fluorescent as well(glows in black light).
Last I sewed the parts together, turned everything inside-out,sewed the hem and added two hooks and eyes to each "tail" to grant a smoother wearing experience. Comfort at a con matters.
Sash

This fabric too I painted with acrylics, as of course, nothing glowing in the dark here is a no-no. The cloth itself was easy to make but the two-was woven stretch velvet was an ordeal. Nevertheless, after sewing over the seams several times so no thread would tear, I could shape it and carefully stitch it to the sash by hand. By the properties of the stretch velvet everything got faintly pulled together in the middle, which positively effected the shape to match my hip's shape. Push buttons on each end of the belt to make putting it on as well as storing it easier, done.
Dress


There isn't much to say about the dress other than I made the sewing pattern myself and that I spent a considerable amount of time sewing on the ribbons.
Buckle

Simple base made from cardboard. The decorating rim is an old USB cable.

Grey fine cardboard(0,5mm) is perfect for a smooth surface and for building details. To spare you repetitions, here also the brooch and the "gems" made of packaging plastic. Both pieces hold LEDs that are powered by the battery cases of fake tealights. The switch in the brooch is a bit smaller. (I had to replace it later with a slightly bigger one on the back, as the tiny one on the side was so sensitive it only survived one convention day.)

A closer look on the LED constructions. To diffuse the light I simply helped myself with hot glue. The parts are attached with push buttons that are sewn onto curtain tape and embedded in the back. Everything was primed with acrylics and waterproof woodglue; spray paint/acrylics/scratch proof acrylic varnish on top. The stones are painted with clear nail polish that I dyed to the right hue with resin dye.
Harp

The harp almost entirely consists of cardboard that held together with curtain tape and a lot of hotglue. The bridge of course, is a wooden staff, as it has to support actual strings. The opposite support consists of embedded screws. more on that in the next picture.

I cut out the detailing with a carpet knife. If you analyse the design, you will notice that the harp ends in two bird heads. I made their eyes of hotglue simply by letting it flow onto the areas in careful circular movement. Here you also already see the holes I drilled into the bridge.
Since I used guitar strings and those are wound onto spools that later secure them on the bottom, I had to cut in notches. To fasten them, I used a stripe of brass plate that I cut, bent and drilled holes in so that I could set it onto the screws and secure it, as well as have the strings run through. (Tip: apply a screw between EACH string so they don't tune each other off! I don't know yet whether I dare trying to correct that...)
Primed with acrylics and waterproof woodglue, the harp is ready for spray painting it. To match it to brass, I then effected some miracles with acrylics. A scratch proof clear varnish provides the necessary protection. Last but not least I screwed zither pegs into the bridge, fastened the strings on the bottom and twisted them around the pegs.
Ears

This time I tried a new and faster method of sculpting ears. It's not quite sound yet, but it works perfectly. Cardboard base hotglued onto the hard plaster casts of my ears and shape sculpted with Fimo Air Light. To grand better drying, I sealed the sculpts with waterproof woodglue in two steps. Afterwards I applied several layers of acrylic dyed liquid latex with a brush. Simply peel off after drying, cut off the excess and done!
Bracelets
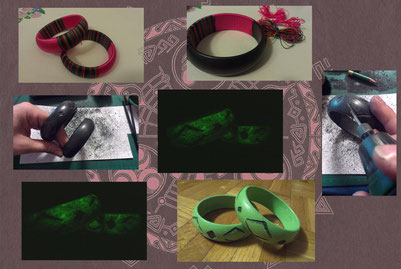
Last, the bracelets, which don't sound like much work, but caused the most dust. The cheap bracelets were wrapped in thread that I had to unwrap instead of cutting it so as to keep it. Then I carved the details into the plastic bracelets. Of course they have to glow in the dark as well. Responsible for that are the usual acrylics.
~~~~~~~~~~~~~~~~~o~0~O~0~o~~~~~~~~~~~~~~~~~
Write a comment
Wedding Dresses (Sunday, 13 August 2017 21:21)
Thanks for sharing this useful info..