The Still Very Secret Project
also known as
The Hellish Resolution All Nerds Do Understand I Love
Or Rather Overwhelming Problems Huge Endeavour Ridiculous Idea Oh Noes
More on that further below. But first, let me take and Elfie - uh - I mean - let's extract those capital letters and see what we get:
Thranduil Oropherion
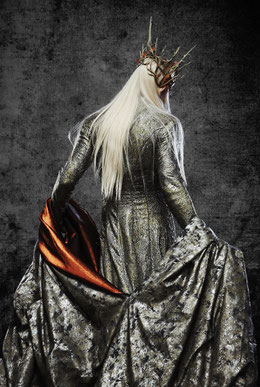

Thranduil, son of Oropher, King of the Woodland Realm.
Father of Legolas.
Pointy-eared antler fetishist, jewellery obsessed Dwarf-hater.
And that is where the interest of many stops.
That Elves don't have round ears, is not their fault and this thing with the antlers as well as the fact that his beloved mount is a gigantic Elk(such the Men in your world have
exterminated long ago) might also have its reasons. The strange passion for gems goes way back to his origins(being a born Sindar from the vanquished realm of King Thingol it appears only
natural) and so does his aversion towards the mining little armour-tanks(they once killed Thingol over a dispute concerning a necklace he had commissioned from them, which lead to the eventual
downfall of Doriath and, among many others, due to that, Oropher had to leave home with his family and seek refuge far in the east before most of original Beleriand was swallowed by the
sea).
And this, is where we already get to how someone becomes the King of Silvan elves so far away from his home. Of course, about 6000 years lie between Thingol's death and the moment
Bilbo Baggins found The One Ring, but that does not make the endeavour easier. Yet to be honest, it was never an endeavour. Not even slightly. All it was, was Oropher's wish to find his small
family a new home. However, having resided near(and perhaps at times even in) Menegroth, which means, practically next to Thingol and therefore being considered as what lowly Men would describe
as "upper class", Oropher had his ways with speech and somehow managed to make the Silvan Elves "suddenly" wish to live in a monarchy with him as their leader.
Forgive me, as an Elf, it is hard for me to simplify the events that have spread over thousands of years in a few sentences for mortals to understand. It is like having to explain to
non-geologists that a million years is to be seen as a minute.
As time flew by, evil began to infest the lands again and the once fallen Maiar Sauron(again I would like to spare you the trouble of having to understand the times when Arda was created) gained power. Sauron corrupted more and more Elves, interbred all sorts of beings with Goblins and already existing Orcs - in short, he created the most horrible suicide squadron you could possibly imagine.
His realm laid on the plains of Mordor in the south-east of Middle-Earth, a volcanic area that provided him with a natural defence of long mountain ranges in three directions. And it was there, where he was defeated.

Marking the beginning of the Third Age, an alliance of Elves and Men had gathered by the entrance to Sauron's vast shelter, forcing him to bring his armies forth. A brutal battle was
unleashed in which the heir to the throne of the Men of Gondor, Isildur, avenged his there slain father and turned the battle by cutting the One Ring off Sauron's hand. This broke Sauron's powers
temporarily and destroyed his mortal body.
Yet once having been a Maiar, his spirit lived on. Most extensively, due to Isildur having been corrupted by the Ring the moment he was to destroy it once and for all in the lava of Mount
Doom.
This is the story all know. Though few only know that Thranduil fought in this battle, alongside his father, who was brutally killed. Whether it was by a Dragon, and if this very
Dragon had badly injured Thranduil himself, he does not speak of. Not even to his son Legolas, who had never met his grandfather.
Destroyed by the loss, it was now on him to take in his father's position and lead what was left the Silvan Elves of the Greenwood. And this would not be the only loss, as his beloved
wife, as well, would die in battle too soon after.

Crushed by grief, he continues to cling to every possible remain of his father or wife, in secret, nearly all of them being of material matter. He cannot dare to open himself to his son, as looking at him alone, reawakens all the horrors of his past, no matter how proud Legolas would make him.

Costume Info
Now what is this whole thing with the secret-mongering?
What's the matter with the project title The Still Very Secret Project? Or the describing anti-acronym The Hellish Resolution All Nerds Do Understand
I Love - Or Rather Overwhelming Problems Huge Endeavour Ridiculous Idea Oh Noes? Yes, I have given you the solution above. But the reason for it is I
didn't want to reveal that I would attend HobbitCon N°4 in Bonn until it was absolutely certain I could get there(I am still
trying to refund things, but you might have stumbled upon that matter). Yet at the same time I wanted to post some progress. However, due to limiting myself to secrets, I couldn't. Yes, I am
still keeping up the spirit, but the news is broken and in spite of loving the fact that I can gather everything about the project under the acronym hasthag #TSVSP everyone knows now that I am
talking about the costumer's hell that is Thranduil. (While his robes may not appear complicated, they are complicated to replicate, let alone all the accessories or props or his armour.) So,
thank you, WetaWorkshop, for the challenge and horror. ;) Which of course is what reflects in the meaning I put into the letters of Thranduil's name(and fact whose son he is).

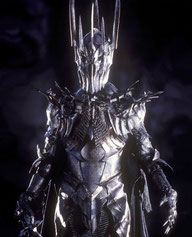
Some promo photos and scans of respective pages from "The Hobbit Chronicles - The Art Of War" © with the rightful owners
Costume Status
- Robe I: patterns traced onto fabrics and cut out
- Cloak I: fabrics bought, patterns done
-
Staff I: DONE
- Robe II: patterns traced onto fabrics and cut out
- Staff II: DONE
- Rings: on hold due to a little disaster
- Brooch: DONE
-
Woodland Crown: DONE
- Robe III: DONE
- Cloak III: DONE
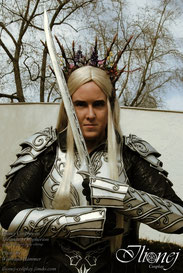
- Armour: DONE
- Swords: DONE
-
Belt: DONE
- Scabbards: DONE
- Tiara: DONE (but need to make another due to stupid mistake when measuring)
- Standard Wig: aaaaand once again, please..
- Standard Ears: DONE
- "Special" Wig: uhm...iiiiiin planning.
- "Special" Prosthetics: in planning
- Lenses: bought
- Party Glasses: lol
HobbitCon4, April 1st-3rd 2016, Maritim, Bonn(Germany)
EOW Merchandise Shop Eröffnung, April 29th 2016, Cineplexx, Graz(Austria)
AkiCon, October 1st 2016, Seifenfabrik, Graz(Austria)
HanamiCon, April 1st 2017, Seifenfabrik, Graz(Austria)
DeviantArt DailyDeviation on swords, Sep. 25th 2016
2nd place Cosplay Contest, AkiCon 2016 (armour)
1st place Cosplay Contest(Japanese), HanamiCon 2017 (black robe with woodland crown, cherry blossom)

Photogallery: Thranduil - Progress
Staffs
First steps

I proudly present, THE CREATION OF THE
HORSE-****-STAFFS! lol (credit for the name goes to my mum)
Yes, this is the most stupid method to make such a big resin cast, but it eventually worked and saved a lot of silicone.

Finished cast of the top. One of it, since one
"failed" and the other actually too because I didn't notice the gold-orange was too light until I took it out of the latex mold. Helped myself with a little bit of acrylic ink. Unfortunately it
blocks most of the light in the middle(hadn't installed the top LEDs at that time, but still). For the second staff(actually N° I - which only myself, the honourable Mr. Dallas Barnett and my mum got to see until HobbitCon) it works just perfect.
I have changed the battery case however, since I found a new method that A)saves space, B)saves those rare battery cases, and C)goes better with my weird bottle-screw-screw.
:P

Mirkwood Seasons Staff


Pt3 is primed like Pt4 and painted with shades graphite and metalic blue acrylics. The gems are made shiny with iridescent acrylic ink.

Woodland Staff


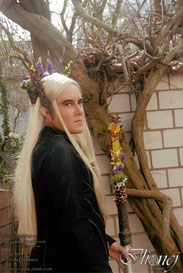
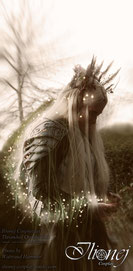
Woodland Crown

How do you photograph something that has too many angles to photograph? And this is just the beginning of the madness!
Brass wire base, roughly held together with hot glue for now. At this point I could have started the sculpting, if it hadn't been for some strange mental illness that made me desire - a party
crown. >.<;;
So I went on an adventure.

After some failed experiments, I ended up with five individual switches(in the front parts by the cheeks) and five individual velcro tape closed battery cases(above behind the ears) where the most twigs are.
The LEDs are:
Red (in the top tips - the longest branches)
Yellow (middle of the top branches and one in the middle on the back of the top row)
Green (lower half on the main tips)
Bluish white (additional tips on the very bottom)
Party Lights (additional tips, equally spread)

When I was done with the sculpting with my beloved so cool hot glue(lol), I of course added a layer of waterproof wood glue. Not only is it easier to apply acrylics on it compared to hot glue, this also seals propable remaining gaps, especially by the cables where there shouldn't be any. The painting process was the same as on the staffs, however with lighter browns. I carefully dabbed only little paint on the tips that should light up. Just enough to make them brown. The rest is done by the yellowish glue. For a match, I did the same on the front tips.

Ah! I knew I had a photo of the autumn leaves/berries before painting!
Yet mainly this focuses on the removable hot glue iciles. I nearly regretted using a silvered copper wire as the base as the wood glue made it oxidate where it wasn't fully covered. But it can't be really seen as I gave them a shimmer with iridescent bluish acrylic ink. The glossy effect is done with nail polish. Never mind the "drying line" though. ^^;
All flowers are removable too and I can chose whatever season I want, or none. For the first day of HobbitCon4 I decided to showcase them all. On day 2 I wanted to wear the tiara, but more on
that further below. The response was so good that I could gladly wear it like this all three days and in spite of the batteries running low during the Cosplay Contest, I had my fun with it.
It sits so well and comfortable with and without a wig and without pins, I can understand why this is a crown made for an immortal king who wears it day after day.
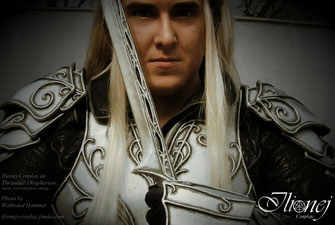
Swords

The reason I held them back was that I wasn't sure whether this strange method would - kidding. Was too busy before the con. :P
I confess, I came across the method of gluing tongue depressors together about two years ago while doing research for Twilight Princess Link. So, I am terribly sorry I can't remember who made the tutorial. BUT IT HOPEFULLY STILL IS SOMEWHERE ON YOUTUBE.
Now.
The method itself is rather easy. Hot glue is truly one of the best inventions that could have ever happened to cosplayers, no lie. Not even wood glue can stick these together so well and at the same time sustain just a little flexibility so the whole thing doesn't crack. For the depressors: they're way cheaper than balsa wood and you can cut them according to the fibres as well as carve them to a certain extent. Good scisors snip across as well. ;)
The base is my now beloved 0,5mm cardboard. I confess, I should have given the edges a little more stability with hot glue at that time as I had issues during the next step due to cardboard naturally soaking water, but I'll remember that in the future. ^^;
[extra credit goes to those hands..you know whose..]

Sculpting time! :D To keep the swords light(and
because of the hot glue inside) I used Fimo Air Light(a polymer clay) to sculpt the base shape. I then transferred the horribly detailed veins onto it, drilled some holes and spent painful hours
cutting the stuff manually. Please don't ask. I still have nightmares from that.
Doing the same pattern in cardboard again - 4 times, was JUST AS MUCH fun.. and "engraving" the whole thing with the back of my carpet knife after applying a layer
of wood glue..
At that point I realised that this particular Fimo would just not be stable enough for such delicate tips, so I removed it there and replaced it with hot glue, which I carefully filed and
hot-sculpted.

"Some" finishing steps on the blades. I primed
everything with silver acrylics before I sealed the surface with waterproof wood glue because A)those acrylics aren't well covering and it's harder to apply them covering on the even wood glue
and B)if I some of the paint would actually get scratched off during an event, you won't see it right away like it happened with nearly every piece of my Blackreach Wizard Guard.
Here you can also see why; as much as I love each and everyone working there; I CURSE WetaWorkshop. WHY!!!
I adore details and ornaments on props, but they're horror to make. :/
But in the end the hilts weren't as time consuming as the blades. I nevertheless made them rounder and the tips more pointed since they lie much better in hand and the edges look less
cheap.
The hilt details are "simply" cut out with a - yes, my big one - carpet knife. Once cut, they easily peeled off the tongue depressors underneath.

The most fun part! No. Not the spray paint. That gave
me all the possible nightmares I don't want to talk about. Just to mention one: you can barely get anything nearly mirroring around here and foil was out of the question. Period.
But the rest was fun. I love weathering/aging/shading. ^^
Scabbards & Belt

Believe it or not, I love cardboard. So sandwich time! The details are made of clothesline. More on that below, in the info on the armour. Priming and painting is the same as with Pt2 of the
Seasons Staff/the armour.
The belt is made of leather, the ornaments are burnt in with a soldering iron. Since the leather is really soft, I couldn't go with appropriate techniques. And - since - the leather - is really -
soft - uh - the hot glue details of the already doublted front did come off a little during HobbitCon. Mostly due to my mistake to not losen the sling (which holds the front to a hook on the
inside of the armour to keep the belt in position) nearly every time I sat down.
I will try to figure a solution to prevent that in the future, and if it is only gluing some harder leather to the rough back.
Oh by the way, the buckles are made from brass wire. Six unnerving buckles. I swear, if someone requests some of those on the shins as well, I'll..

I blackened the buckles with liver of sulfur. Unfortunately you get the best result on copper(therefore only the oxidated areas on the brass got dark enough), but I burnt it to give it a longer stay. The rest comes with age/as little friction as possible.
A FAIR WARNING! WHEN WORKING WITH LIVER OF SULFUR, USE RUBBER GLOVES! IT CAN IRRITATE YOUR SKIN(and even a single drop does stay long on it, in an ugly yellowish brown)! And when burning it, USE PROPER BREATHING PROTECTION! OPEN A WINDOW TOO!
To be able to remove the scabbards for storage, I sewed bits of strap from a former bag to the belt and added hooks and eyes. Yet 2 weren't enough and one a sword was in one of the scabbards, the weight pulled too much on the top. So I'll add another per strap. If that's not enough, I'll add more strings like on the front.
If you wonder, I made the scabbards I little too narrow at first, so I cut them open on the bottom, inserted hot glue and re-painted the areas. No getting stuck anymore. :)
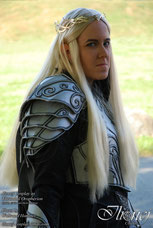
Armour

For little more on making such patterns, go to the Blackreach Wizard Guard, please. It's simple, believe me.

Patterns transferred onto cardboard and ready for the hot glue sandwiching. ^^ I connected the pieces of regular cardboard with curtain tape. Then I glued on the backside and sealed the pieces with glue. But before I repeated it on the front layer, I cut gaps and glued in the straps.(how poetic) As you can see, I made some alterations on the feet. Simply cut that away. Also they're not like on the original armour. Those looked too less Elvish to me, I confess.


Wings

I don't know how I came to name them "wings". Maybe because they look like such? They're bundles of leaves. And they are partly why I saved painting the inside for later. The lower ends of the
pauldrons' back are cut open for the velcro tape that keeps those wings firmly in place. The real thing is leather, I used faux leather because I naturally am not a rich person. Still it was hard
enough to cut and my hand was numb afterwards.
To ensure they don't slide apart, I roughly sewed the pieces together before I sewed on the velcro. That shorter strip is intention. It is one of the two top wings and under a smaller part of the
pauldron.
All wings are painted with acrylics. Silver first, then..

..a mix of silver and black for the details. This is why I cut holes into the templates: the original wings have laser cut holes. Since I neither have a laser cutter, nor am suicidal, I spent about 2h dabbing on paint with a brush.
I chose this pleather not only by its pattern, but by the inside. This was the only black one available with structure and NO writing on the inside. Instead it has some stylised flower ornament, which I liked.
However I might not have thought of the thickness, but it only affected the fact that I had to go without the lowest wing. I might leave another on the top in future as it sometimes hides the plate below. :/ Otherwise all's fine.
Cape III

This was probably the roughest sewing work I've ever done. I have used the pattern of Cape I, very roughly traced it onto that annoying stretchy velvet, altered it ON the velvet several times
with a little strange intuition, cut quickly and did this no-no of simply placing the red on the silver velvet to repeat. Then I spent more than half an hour pinning that horror together. Quickly
sewn, turned over and sewn along the edge again to stick the fabrics smoothly together as well as close the neck. Yes, done at 1am, in less than 2h from scratch and scoring a perfect fit.
Yes, I could have made it broader on the shoulders like the original cape is, but that would have required making each layer a two-part-piece and a lot of more planning and trying on the pattern,
for which I neither had the nerves, nor the time. Plus, isn't it more beautiful without a seam in the middle? ^^
And here's tow shots of the hooks. Six hooks and eyes were enough to keept the cape in place and although it's quite heavy, I didn't feel the weight at all.
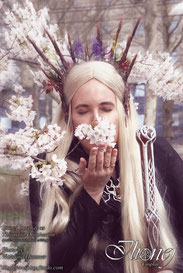
Tiara

Never. Never again. But never say never, right? lol Template is hand-drawn, then copied to save the original. Also printing ink doesn't come off paper easily. ;) Glued it onto this massive 1,5mm
brass plate, drilled maaaaaany little holes and hand-cut everything with a saw. Figuring how to reach every angle wasn't easy. With some filing and grinding I managed though.
The lines are punched in and a little structure from the back to the middle each side very roughly milled.
Before soldering it together at 2 small points, I bent and hammered it to fit - argh - that was when I realised I made it for my own head. With nothing on. Not thinking I'd have my real hair wound around with a wig on top. lol Oh well, the second try won't be out of metal, that's for sure. And besides, I keep believing the original once belonged to Thranduil's wife. Who said she had blond hair? ;))))
I didn't silver-plate it myself however. Left that to a specialist.
The gem on the forehead is opalescent glass. It sits perfectly well, but nevertheless I glued it in to be on the safe side. And no, it doesn't glow. That's just something that happened due to a lucky lighting fail. XD Found it too funny not to show.
Brooch

The template I used is part of what I'd drawn for a certain bottle.
[A LINK WILL BE SEEN HERE ONCE THE PROJECT IS ONLINE]
There isn't much of the progress that was interesting, therefore I didn't take photos. It is really just bending brass wire and grinding the tips. Then soldering pieces together and inserting a brass plate before soldering on the prongs, as well as the pipe and hook for the steel needle. Before inserting said needle, I had it silver-plated.
For the gem I used little glass shards and hot glue. Waterproof wood glue, just a little acrylic ink and nail polish for the surface.
Robes


I GUESS, I have loaded myself with quite an extensive project there..
..and these aren't even all the fabrics and patterns for the 3 robes yet..
Robe III - black

I had to make myself effin' 25m of piping. x_x
BECAUSE IT WASN'T AVAILABLE IN ANY GREY!! And ordering would have taken 2-3 weeks, which I didn't have, of course. (ordered some for later though) I guess that's what you got to live with when
you start too late. But I had to wait until after Christmas because I couldn't risk to not fit into the robe. And since the armour consumed more than 200h..and I got sick twice.. Oh well. I got
it done in 1h40. Meditative fun.
The lining was also quite interesting to make. To give the chest area more stability, I made it from a strange mix between linen and coutil. I really don't know what it is, but it's cheap, cotton
and amazing! The piece of ornamented fabric you can see here, is the actual lining for the sleeves and "skirt".
Ah yes! A little bit of cover fabric fell into here! :D The ever so awesome cover. >:| Not that the fabric itself bothered me..

Luckily there were three lines of piping on the back to train with. Because, of course, I had to break one of the TOP rules of Cosplay: NEVER MAKE ANYTHING FAR ABOVE YOUR LEVEL!!
Did I have a choice? Nooooooo. X'D I nearly failed, almost cracked up, learned a lot and will have to re-sew half of the hem. But other than that making the sleeves(my second pair ever) too short gave me the chance to showcase the lining material, I think I may have succeeded nevertheless. Now two more times again, "please". lol
Brooch-Buttons

Wigs

Hmmm..what could that be..
Bathing wigs in fabric softener is fun.
Bottom left is a little comparison. I hope you can see the difference between the excess braids which I haven't washed, the left wig after 5 days in the water and the right wig after 5 + 6
days.
On the right you can see one of the wigs after being bathed twice, WITH FLASH!!!
Aaaaand on the bottom right..whoever..

Before sewing in whefts, it was way too flat and thin. Then it asked for a lace front and perfect hairline. Then I didn't have time for that. Because then, was HobbitCon. Too bad the con left too many marks. No idea what I'll do with that wig now. :(
Ears

Nothing better than making prosthetic ears yourself. ^^
On top you can see a comparison of the two sculpts: right is my very first try to make small pointed ears for my already small ears, left is Thranduil's.
The middle is during the process of painting several layers of liquid latex(dyed with acrylics) on and the final product, with most of the edges trimmed.
Then of course a few angles while worn at HobbitCon. I did put a little makeup onto them to give them a more natural look and blend the bits that had to be blended in spite of the match, which
you can see in that photo my mum took before we returned to the last HobbitCon Party ever. :/
(I was too tired to even free my hair. There it's still under the wig cap beneath the woolen cap. lol And even if everyone says you can put on ear clips etc. to hide the seams, with mine it wasn't necessary. Just did that for the party.)
~~~~~~~~~~~~~~~~~o~0~O~0~o~~~~~~~~~~~~~~~~~
Photogallery: Thranduil - Done

Artwork, photos, setting: ©Sandra F. Hammer, 2015/16
Original design: ©WetaWorkshop
Length: 81cm each
Materials: cardborard, tongue depressors, hot glue, light-weight airdrying polymer clay, waterproof wood glue, acrylics, spray paint, acrylic varnish
I couldn't decide which photo I should chose, so you'll get the three I like most and some close-ups, as well as how you can see through the holes.
And yes, the blades ARE mirroring, if only faintly.

Artwork, photos, setting: ©Sandra F. Hammer, 2016
Photos worn: ©Waltraud Hammer, 2016
Original design: ©WetaWorkshop
Materials: brass wire, silvered copper wire, LEDs, cables, 5 sliding switches, 5 battery cases, verlcro tape, hot glue,
waterproof wood glue, acrylics, acrylic ink, acrylic varnish, nail polish, acrylic painted artificial flowers
Left row:
~ "naked" crown
~ rgbg lights
~ rgbg lights close-up
~ all lights
Right row: some snapshots of the party lights
"Circle": all four seasons with and without their respective lights (When the icicles are on, the only way to take a photo is to put the crown down on its front or wear it, sorry.)
Middle: some photos from HobbitCon4

Artwork, photos, setting: ©Sandra F. Hammer, 2016
Original design: ©WetaWorkshop
Materials: silver-plated 1,5mm brass plate, glass

Artwork, photo, setting: ©Sandra F. Hammer, 2016
Original design: ©WetaWorkshop
Size: 9,5x8,5cm
Materials: silver-plated brass wires, pipe and plate; steel needle; glass shards, hot glue, waterproof wood glue, acrylic ink, nail polish
~~~~~~~~~~~~~~~~~o~0~O~0~o~~~~~~~~~~~~~~~~~
Write a comment